
Self-Reflective-Journal: Week Five:

← FX Menu
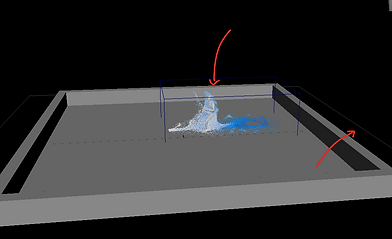
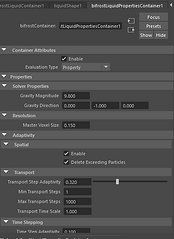
Here was our first tutorial on Bifrost simulation. First we set the menu to FX and selected the characters geometry. I went under Bifrost fluids and selected Liquid which created a Bifrost emitter around the character. After changing the playback speed we selected the bifrostEmitterProps1 (emitterProps1) in the outliner and enabled continuous emission of fluid particles. I played back the timeline to see how the simulation worked. Then I shift selected the birforstLiquid1 and Base:pCube1 and went to bifrost fluids tab and made a collider. This will make the fluids collide with the base. I then created a Killplane by selecting bifrostLiquid1 and going over bifrost fluids tab and making killplane. I selected the killplane and scaled to extend beyond the base. I enabled bifrost meshing and played back the simulation to see the adjustments of the fluids to the character. In the bifrostLiquiPropertiesContainer1 I changed the Master Voxel Size from 0.5 to 0.15, this made the fluids more detailed. I played around with the gravity magnitude and velocity scale to see how the liquid simulation behaved. I then added a aiStandardSurface and used the water pre-set to get a fluid like look. In render with a Arnold standard light I could see how the liquid simulation would look like.
← Link to playblast of Bifrost simulation
bifrostLiquid1

← Bifrost Fluids tab

bifrostKillplane1

← Outliner for Bifrost Fluids
← Attribute Editor, emitterProps1 properties
← Attribute Editor, Gravity Magnitude and Master Voxel Size
Simulation Ideas:
- aiStandardSurface material make person glass
- Bifrost Liquid Simulation for person and environment
- Mash for person mesh (triangle shape poly models from a cube shapes to mimic glass - change vertetx shape of cube to make triangle shape)
- Then nParticles (spheres imitating bubbles/orbs) for background effect
- Bifrost on floor and Bifrost on character
- Mash with wires (trails node) with nParticles in background
Self-Reflective-Journal: Week Five:
In today's lecture with Gregory we explored the usage of sound design and how diegetic and non-diegetic sound can impact the final video's m0od and emotion. We learned that 'Atmos' (atmosphere) and sound effects anchor the scene that could give a sense of realism. We learned the four different elements of sound design i.e. dialogue, sound effect, Atmos and music. Learning these principles made me think of ways I could create sound in my composition. I decided I would play around in 'GarageBand' and make a musical composition with piano as my scene would be modelled to look like a Victorian/glass house inspired look. I wanted the music to be emotional wit lots of echo and reverb. If I were not able to come up with a composition I liked I would find a copyright free audio that was similar to my idea. I wasn't that sure about atmospheric sounds as I wanted to emulate a music video/trailer.
Then in Emily's class we had an introduction practice into Bifrost. We experimented with the different simulation settings and standard materials.